Friday 29 October 2010

WAY AHEAD!

I normally end up running around trying to get my Christmas cards done at the last minute, which usually means sending them the week before the big day!  This year I have finally managed to get ahead.  I've kept my cards in the same design but just changed the colour scheme. 

Using PTI Berry Sorbet (I LOVE this colour!)


Using PTI Ocean Tides cardstock

Finally, PTI Kraft.

Card insert

Box for the card to go in

The patterned paper is a gorgeous raised glitter from Dovecraft's Let it Snow Collection. The image, sentiment and ink used is all PTI. They were fairly quick to put together.  I made a box for each of them to go in to keep them looking pretty and make them that little bit more special to receive.


Tuesday 26 October 2010

APRON STRINGS

Hi all

I saw this design used as a card on someone's blog (sorry I can't remember who but I think it was Lauren Meader again) and thought it would be perfect for a little gift holder.


It will be great for me to use to give as a gift for my mum and I made two others in different colours which I hope to put on my craft stall later this month.  I've just got to decide what to put in them now!


I hand cut two of the design and dressed up the fronts on each.  The pockets are raised with foam pads and topped with  matching ribbon.  I then made a box from one sheet of 8.5 x 11" cardstock and punched a pattern on the sides that would show.


I've popped my little teddy in here, he's about 6" high and 3" wide so the box will hold a decent size gift.  I plan to fill one for my mum with a house plant.  I tied the handles together with a bit of matching ribbon to make it easier to carry.

Catch you soon.
Zoe x

Wednesday 20 October 2010

SPOOKY TREATS

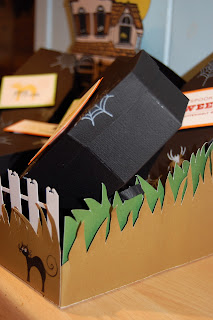
As Halloween will soon be here, my coffins are on the rise again. I made a load of these last year and they went down really well so I made more this year but this time I wanted to make them feel at home, so I made up a little cemetery for them all to sit in. Cute eh!

I know its not the best in the world and if I’d had a bit more time, I’d have made a bit more effort on the grass and the fencing but overall, I thinks it’s pretty cool!

I cut up the lid of a copier paper box I got from work and slopped the sides a bit so it was taller at the back and lower at the front. I trimmed up the grass in two shades of green with scissors and stuck this to the outside of the box.  I found some great free clipart online of the ghostly house, the headstone and Dracula and printed them on to some heavy weight cardstock. I filled the box with shredded black tissue paper and cut out my clipart images and stuck them in place. The fence was made using some white cardstock cut into strips and them I used a fleur de leis punch on one end to make the finials. I should have inked the edges and made some of them a bit crooked but it was all together before I thought of that so its was too late!


The only thing I really am not happy with is the cemetery sign, I am going to change that and put something a bit more scary looking there. 

The coffins where made up from a template from Martha Stewart and I stamped images on the outside using a set from PTI.  I glittered the cobwebs with some silver stickles but these don't really show up on the pics.  I used some PTI patterned papers to cover the inside of the lid.

These are dead easy to make and I whipped this lot up in under an hour.  The cemetery took a bit longer!  Martha Stewart has some fab templates on her website and they are all free so check it out.

The clipart I blew up, printed and cut out then added a bit of glitter here and there, Dracula's eyes and teeth and the eye's in the windows of the house.


If you want the template for these, they are here  http://www.marthastewart.com/article/coffin-treat-box.
There are two links on the page, one for the lid and one for the base plus instructions.
The grass edging I inked up a bit which isn't really clear in the photograph but it looks good.  I've also made some other Halloween bits which aren't finished yet but will post once done.

I've filled them all with some chocolate pumpkins, ghosts, witches fingers and dracula teeth and a couple of nice juicy eyeballs!  There are lot more in here than it looks.


I wish this was as popular when I was young as its getting now.  I loved the dressing up bit far more than knocking on doors hoping for some treats.  I used to make up all my own costumes and my sister's, we had a real laugh using all mum's make up - don't think mum was too impressed with that mind you!

Hope you all have a great Halloween with the kiddies and eat lots and lots and LOTS of chocolate girls, I know I will!
Hugs
Zoe x

Friday 15 October 2010

WEDDED BLISS

I'm enjoying doing my scrapbooking again and as I was going through my photos, I came across our wedding album so decided to make up a page about our day.


We've been married for twenty years now but I still remember every moment about that day.  I've still got the dress, all boxed up in the loft although I would seriously struggle to get into it these days - there have been several bars of chocolate consumed since that day I can tell you!


It took me a while to get the journalling page laid out just the way I wanted it but I am happy with the end result, just what I was aiming for.  I added the text to the photo in Photoshop and used a small scrap of fine sandpaper to rough up the edges of the pic before I adhered it to the cardstock. 

Zoe x

Sunday 10 October 2010

THIS IS NOT CRAFTING BUT...

There are no cards or 3D projects today,  I just wanted to share a few things that are close to my heart these days.  Since moving to Wales and trying to live the country live, we've discovered a lot of things about ourselves.  Mostly that is that City life was never really for us and we are glad not be in it anymore, although I confess to missing a night out in old London town once in while, visiting a few of our favourite restaurants but certainly not the traffic !!!

I just had to share these photos with you. 

The winter is REALLY winter -  at least the ones I've seen anyway!

BUT  the summer is fab!

My scrapbook was missing my presence so when my little Sis visited us for a few days
 this pic just had to be taken - our toes sharing a special moment in the sand !


I fab little shot of a sheep and her little lamb in the field behind us from earlier this summer.

My hens, who look to be on a bit of a mission!

Need a ride?  The sort of thing I never noticed before I had the time to look.

I have no idea why I'm sharing these with you.  I guess I just feel really settled and happy these days and why not share that?  Now I'm not saying that life here is the best thing since sliced bread and theres nothing better than this, but I gotta say..... IT WORKS FOR ME!

Zoe
x

P.S.  sorry if this was REALLY boring :)

Thursday 7 October 2010

WELCOME LITTLE BABY


I've have been itching to have a play with this gorgeous template from Lauren Meader and this is my version of it.  It was a super simple template to follow and a treat to make.  The template can be purchased and downloaded HERE  if you want to have a go. 


I stamped the teddy image and added glitter to his feet then tied some gold ribbon around the carriage, fixed at the back.  For the wheels I just used a large circle punch and fixed some large white buttons on each to make them a bit more sturdy.


The inside is filled with two little pairs of socks, a hat, a bib and a dummy.  I stamped the sentiment and added some bling and popped on the side with foam pads and a little flower to the carriage roof.  Its all been wrapped in florist cellophane and tied with a ribbon.  I made a tag for it and it was done.  Dead cute isn't it.


Hope you enjoyed.
Zoe x


Saturday 2 October 2010

BURIED TREASURE

Hi All

I adore all three of the Pirates of the Caribbean films, (although I do not pretend to really understand whats going on in the third one - am I the only one!?) and you've just gotta LOVE Johnny Depp!!!! 

Whilst shopping the other day in Tesco I found some real cute little pirate hats and some little swords and I thought how cool would it be to make a mini treasure chest to go with these.  Well, here's what I came up with...


I used the base from Lauren Meaders Bouncing Baby Buggy template to make the base of the chest out of black cardstock.  I then cut 1" wide strips of kraft cardstock and inked the edge with some dye ink.  I fixed these to the base in layers and then trimmed to size.  I used some of strips silver cardstock to make a 'metal' edge around the top which was folded over the top and inside the chest.  Then I used a black Sharpie pen to make the screw bolts down the sides.

The lid was another matter and took me three attempts to get it right.  In the end I found the best way that worked for me was to cut a long strip of black card to the same width as the chest and lined one side of it with more strips of kraft cardstock but let them overhang each side by 2-3 inches.  Once I had covered enough of it so that when I curled the covered part of the black cardstock into an arch it would make a good shape at the right depth of the chest, I scored and folded the the overhanging kraft card down to make my sides which I fixed together on the inside with tape.  This then made the arched lid ready for the base to be added.  I then cut a another piece of black cardstock to make a flat base and fixed this to my lid. 

To adhere the lid to the chest, I cut another strip of black card, about 3 inch wide and the length of the lid and scored along the middle, folded and fixed one half to the lid and then the other half to the inside of the back of the chest.  I have to admit it felt like a lot of work at the time but trying to explain how I did it is actually much harder!  I hope I am being relatively clear here, although I think if you actually try it you'll be able to see what I mean better.  In fact you may well come up with a better way altogether!

The lid has some silver cardstock fixed around the edge as I did for the chest to make it look like metal and then out came my Sharpie pen again to add some detail.


I filled the chest with some chocolate coins and a little pirate puzzle game.  I then made a small base for it to sit on out of chipboard which I covered with some sand coloured glittery cardstock.  I found some clipart of a parrot, cut this out and fixed to the base.  I laid two swords at the front and a couple of the pirate hats at the back (they are made of foam and are very light and pliable.  I wrapped this all up with some florist cellophane and secured with black ribbon.


Front View


Back View

Side View

The tag I made to go with it.

This project was a real treat to make, it took a while to get it all done but it was worth all the effort.

Hugs
Zoe x