Tuesday, 29 June 2010

FOR THE LOVE OF A LIST

I have been going through a bit of an addition with note pads recently.  I love making a list about anything frankly.  Shopping lists, meal planners, packing list, things to do, new craft bits to order, anything!  I bought a bunch of narrow lined pads from the local stationery shop and got to work. 

The cover of this one is stamped with some HeroArts stamps.  I bought a job lot from QVC ages ago and keep all my stamps in a my new Anna Griffin binders (which are brilliant, again QVC) but because I've filed them in there I have thrown out the packaging so I can't remember the designers or the names of half my stamps now!


I used one of their frame stamps and made a pattern on to my white cardstock.  Then I used one of the arrow stamps from the same set (sorry this is one of those I can't remember the name of!) in red ink to match the cover of the notepad. 

This one is using the same set of stamps and the same technique.  I used PTI stamps to make my labels for both, punched out with some EK Success punches and added the usual foam pad to the back of it to pop it off the front cover. I meant to take a pic of the inside actually showing the notepad itself but forgot!

This is the last one I made before I packed up for the day.


The picture makes the ribbon look a lot darker than it actually is, in fact it makes it look a bit grey but it is actually blue and a pretty close match to the blue cardstock.

Dog walking beckons!  Off to a local estate with some great woods and a beautiful lily pond.  Hope the weather holds!

Hugs
Zoe x

Saturday, 26 June 2010

DOING YOUR BIT

Morning all.  Hope you're having a good day so far.  Thought I'd share a few more of the cards I've made for the local WI charity function.


Although I sell a lot of my cards to help me pay for my addition :) !!  I do sell quite a lot for charity events hopefully helping them to raise as much as possible for their cause.  I mostly tend to go with cancer charity events.  My dad had cologne cancer and my elder sister had breast cancer but is now doing really well, so it's something very close to my heart.


I recently spent a small fortune ordering a load of stuff from Papertrey Ink and am off now to order a load more. I LOVE their products just hate the postage costs and the dreaded customs duty - they even charge you VAT on the postage costs to get it here! Cheeky.

Thanks for stopping by.
Zoe
x

Wednesday, 23 June 2010

THE COMPLETE PACKAGE

I've been busy working on a load of bits to sell at the local WI for a charity function taking place next week.  Although I've made lots of individual cards, I also tried making some notelet sets.  I decided on a complete package... cards, envelopes, a pen and even the stamps to send them with!

I based all the cards on the same design but did each one in a different colour.  The card is stamped with PTI Polka Dot Basics on to their Kraft cardstock, then overstamped the leaf design in Snow White ink.  The leaf design is from Hero Arts and the sentiment is again PTI.


I finished each one with a strip of ribbon and attached to the co-ordinating card stock base.  Below are all the colours I used.


To make the postage stamps look a bit nicer in the box I made a matchbook to fit them and then stamped the front of it in the same design as the cards.


I made a presentation box to put them all in from a template I have for a much larger card and inserted a divider to separate the cards from the pen and the postage stamps.   I made a little raised shelf to the right hand side of the box to hold the stamps and the pen so they weren't flat in the base of the box.  I fixed the matchbook to the this with a couple of small glue dots to hold them in place, then cut a small slit either side of the pen and threaded and tied some ribbon through to the hold the pen in place.

I put the whole thing into a large cellophane card bag and attached my label to the front.


Once I'd got to grips with the templates for all this lot, I whipped up another bunch with a different design, again all different colours but same design.


I am so, so pleased with these and hopefully they will sell well and make some money for the WI.

Enjoy your day.
Zoe
x

Saturday, 19 June 2010

THERE’S JUST NOTHING BETTER.... than the weekend!!!

Yippeeee, its the weekend and this one has been a long time coming.  Been a mad week at work. I seem to have loads on but at the end of the day it feels like I have completed nothing!  Still a pile of files to go through and it seems at times that it will never end - ever have those kind of days?

Well I am super glad to see Saturday arrive and I enjoyed a long lie in, having a cuddle with the dog (hubby was already out playing golf at the crack of the dawn this morning!).  He's so lush and will sleep even longer than me unless I get him up in the morning.

Just look at him...


Spent the rest of this morning making up some cards so thought I'd share a couple of with you.


I coloured this with Copics and confess I am no master at this.  I look at other talented ladies blogs and their colouring is fabulous.  I am practising and its coming along but they are far from perfect.  I bought this stamp on ebay a while ago but I didn't have a sentiment I liked to go with this image so I did this one on my computer and printed it out on to cardstock.

This one I love because it is so simple and quite elegant really.  Black and green, another classic combination I think and the ribbon and buttons just finish it off.

Hope you enjoy your weekend.
Take care and thanks so much for taking the time to pop over and see what I've been up to.

Hugs
Zoe
x


Thursday, 17 June 2010

ACROSS THE MILES


Its my favorite colour combination again today...

 ORANGE and BLUE!  

It always brings a smile to my face when I get these two together.  So bright and fresh. 

I stamped the images and then coloured with Copics.  I used some chalks to touch up the skyline then used my circle Spellbinder die cutter to punch it out.  I don't have the scallop edge dies yet so I used my Fiskars scallop scissors to cut around the circle in blue card to match my card base. 

Once I attached the orange pattern paper to the card, I attached two strips of double sided tape on to the paper and sprinkled on some glitter.  I stamped my sentiment and then cut into a long strip and snipped the end to make the banner.  Once it was all assembled I just added my little button threaded with some white twine.  I love the finished result.

Enjoy your day.

Thanks for taking a look.
Zoe x

Wednesday, 16 June 2010

WHAT A PEACH


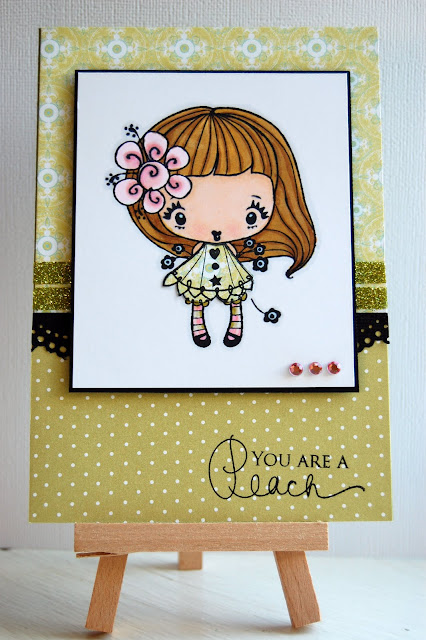
I was lucky enough to win this stamp on an eBay listing from a little blogging friend of mine a while ago (thanks Steph!) and this is the first time I have used it.    I am not the best at this colouring lark with my copic's but I am pretty pleased with the results on this one (any tips to improve would be gratefully received by the way).  I think she is soooooo cute.

I have put off using her as I was unsure about colouring her hair and getting the tones right as there is so much of it but you've just gotta start somewhere right, so this is my first attempt!  I think I need to work a bit more on the shading but I'm good with this for now.

I used two patterned papers from PTI as the base and used my fabulous Martha Stewart glitter again on some double sided tape.  I mounted the image onto some black card and foam pads to raise from the card. Stamped with a greeting and added some pink gems.

I am pleased with the result and I am now on the hunt to more of these little gems (hopefully I will win some of yours again Steph - fingers crossed!).

I've gotta scoot now, Twilight is just starting and I HAVE to watch it (for the 100th time).

Have a good evening - can't believe this weather we are having a the moment.  Glorious!

Hugs
Zoe x

Monday, 14 June 2010

JUST A QUICKIE…

Just a very quick one today, I am redecorating the bedroom and am about to master the art (or not as the case may be!) of putting up coving on my own… aaahhhh.  Hubby is away on a golf tour for a few days so I am trying my best to get as much finished as possible as he has no clue I am doing this! I’ve done the worst bits, all the sanding of doors and rads and filling in gaps so once the coving is up it’ll be on to the best bit for me - the painting and wallpapering. I really love painting. I find it really therapeutic and relaxing but needed a break from the prepping so I grabbed a coffee and knocked up this card.


This really didn’t take long at all – 10 minutes max I would say. I used my square punches to cut out the green and black squares and fixed them to the base of the card. I then stamped the image, cut out, adhered some gems and fixed some foam pads to the back of the image to raise it from the card. Super simple and quick.


Well back to the coving. I have a feeling I will be pulling glue from my hair for the next few days if this doesn’t stay up – wish me luck!

Have a good one.
Hugs
Zoe x

Saturday, 12 June 2010

NO WORDS NEEDED

I like to make up cards occasionally without any sentiments on them. I confess this is not an easy thing for me to achieve because I always tend to feel it needs something but in reality they don’t always.

I intended to add something to this once it was all together but the more I looked at the finished card the more I thought, no leave it alone its fine as it is. The good thing is you can use this for practically anything. I love the colour combination and although the white space top and bottom was intended to house the sentiment, without it it feels more open and focuses your eye to the image.

Hope you like it. Have a great day all.
Zoe

Tuesday, 8 June 2010

BUTTON MANIC

Hi all. Hope you’re having a great day.

Today’s offering is for my niece who has just got engaged and I wanted to make a little card for them.


Her favourite colour is green so that is the basis of my card with just a touch of cream to break it up a little. I chose this particular sentiment because I wanted something different from the usual ‘congratulations’ that you generally get on engagement cards. The background paper is from DCWV’s Luxury Stack collection. The stamped pattern is using PTI’s Background Basics – Spots & Dots and this is stamped in PTI’s Spring Moss. I finished it all off with colour co-ordinated ribbon and some big buttons.

My niece has asked me to do all her wedding stationery which is really flattering and I am currently working on some ideas for her to have a look at (will share once I’ve come up with something).

Thanks for visiting.
Zoe

Saturday, 5 June 2010

SIMPLY FAUNA

Today I’m sharing a card that is a pretty simple one with just a token embellishment to it, a bit of stamping and some little gems.


I enjoy these sometimes when you just need to whip something up in a hurry and although there is not much to it, it seems to work. This is for my little sister who’s having a party to celebrate her daughters engagement. I’m working on a card for the happy couple too and will share once it done.

Thanks for visiting my blog! I hope that your day is filled with crafty happiness!


Hugs
Zoe x

Wednesday, 2 June 2010

ALL BLUE

No I’m not feeling sad, quite the opposite in fact. I’ve just had a massive bar of chocolate all to myself and am feeling great! We all need our little fix don’t we and mine is definitely chocolate. YUM!


Anyway back to the card. Sorry - I’m using my glitter pots again and tried a strip of it above my sentiment this time. I’m fairly pleased with this one, but once it was completed I felt it could have done with a little less open space around the sentiment. However, the aim for me on this one was to see if the strip of glitter worked which I’d seen being used on the PTI site somewhere and wanted to give it a go. It’s real easy – put a strip of double sided tape in place and sprinkle your glitter on it. (Sorry if I’m telling you how to suck eggs here!)


See you soon
Hugs Zoe